
How can you produce a high-quality Twitch stream for your followers?
Whether you’ve been streaming for years or you’re contemplating your first broadcast, it helps to know what TwitchTV server to use.
You’ll also want some specific equipment available to support your streams.
Whether you play video games or have something closer to a podcast, this guide will help you get the most out of your investment in live streaming.
JTVPing – Find Your Best TwitchTV Server
JTVPing was a program in the 2010s that allowed users to ping every Twitch server. This methodology enabled everyone to find the fastest one possible to use. Since it was retired due to Twitch API changes, your primary alternative for this service is now the TwitchTest tool.
JTVPing performed bandwidth tests for Twitch. If you wanted to stream on that platform, this tool lets you direct the information toward the best server.
By having a fast server for your content, it was easier to have viewers watch without experiencing buffering or lag. Although you could always choose a different one, this resource simplified the process during the early days of live streaming services.
Now that TwitchTest is your primary option, you have a lightweight way to perform bandwidth tests similarly to JTVPing. The only problem is that macOS users will need to run an emulator to use this service since it is built for Windows.
The good news is that TwitchTest is an open-source program that lets you measure upload speeds to each Twitch server without cost. Your goal is to pick one with a low RTT, sufficient bandwidth, and a strong quality rating to ensure your content achieves the best results.
If you’re unsure of what to look for when searching for better servers, here is a brief overview of the terms.
Here Is What the Different Numbers Mean When Server Searching
| Bandwidth: | This information lets you see what the server can sustain during the test upload. TwitchTest doesn’t go above 10 Mbps during this process, especially since Twitch recommends that you use a maximum of 6 Mbps when streaming new content. |
| Quality: | You can use this metric to gauge the overall quality and stability of the connection. It also looks at the number of re-transmitted packets and the rate at which the data gets sent. The best score is a 100, but anything above an 80 is necessary to have a stable stream. |
| RTT: | RTT stands for “round trip time.” It’s a measurement of how long it takes to connect with a server. If you try to reach one further away from your location, it’ll return with a higher reading. |
If you have an Internet connection that doesn’t allow for 10 Mbps uploads or faster, your quality numbers could be lower than what they should be because of your speeds. That’s why a review of your current ISP setup is worth considering before trying to stream on Twitch.
Some extensions for Google Chrome can locate Twitch servers in similar ways. You’d need to download the browser before you could proceed with tools like Twitch Server Locator.
What Equipment Do I Need to Stream on Twitch?
Thanks to streamers like Shroud, Ninja, and Dr. Disrespect, Twitch exploded in popularity since 2015. The partnership with Amazon has also helped this platform, especially since many games offer exclusive rewards for participating in specific events.
You don’t need to have millions of followers to start streaming your gaming sessions. It doesn’t take thousands of dollars in equipment either. All you need are a few necessities to begin your journey on Twitch.
1. The Best Microphone You Can Afford
When you want to start streaming your activities or gameplay, the built-in microphone for your external webcam or laptop won’t achieve the quality you need. People will hear you with hollow, compressed tones that are quite unappealing.
You’ll want to invest in an actual microphone to ensure the streaming experience is beneficial to everyone.
Most people translate “high-quality mic” into “expensive microphone.” That isn’t necessarily the case. You can find several excellent options available right now that connect via the USB port to your equipment.
The best option is to purchase a studio-quality microphone with a required audio interface.
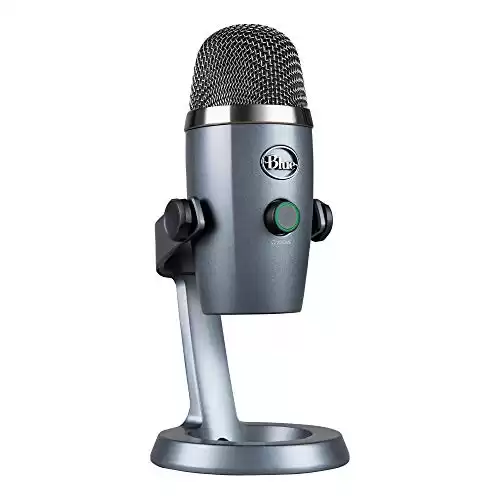
My recommendation in this category is the Blue Yeti Nano USB Microphone. It delivers a consistent performance while offering different voice effects and pickup patterns. You can work within a small footprint without compromising on the audio quality you send out to your audience.
The Blue Yeti Nano also delivers plug-and-play compatibility on PC or Mac.
2. Windscreens or Pop Filters
Windscreens or pop filters reduce the impact that certain letters have when spoken into a microphone. These products are a circular, mesh-looking product that prevents air puffs from words with a hard “B” or “P” sound from interfering with the stream or recording.
If you watch anyone working with a bare microphone, you’ll hear the popping sounds that come from those words.
A windscreen serves a similar purpose by covering the microphone’s surface with foam. This product is easier to set up since it slips over the device, but it can also reduce the pickups for your voice’s higher frequencies.
Either choice will improve your twitch stream.
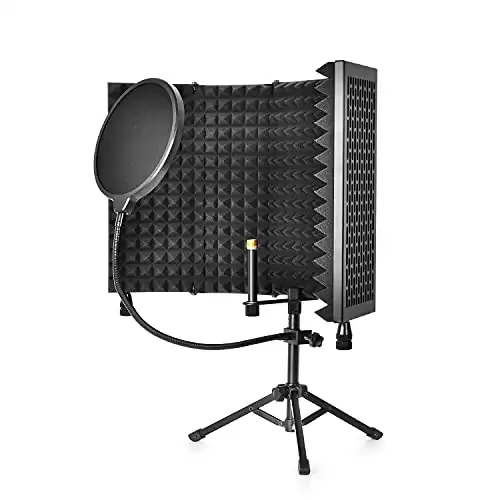
I recommend the CODN Recording Microphone Isolation Shield for your broadcasting needs. This product comes with a folding sound shield that absorbs extra noise when your voice gets directed toward the microphone. It’s composed of five panels built with iron to ensure long-term durability.
You can fix the shield on a table or counter, place it on your desk, and put the pop screen and microphone stand in front to create high-quality audio immediately.
3. Microphone Suspension Stand
Although you can place some microphones on your desk, it isn’t the ideal way to record audio because it is in your way. Depending on your setup, that design might force you to hunch while speaking into the mic.
Not only does that kill your video optics, but it also puts a painful strain on your back that could limit your streaming activities.
You could crank up the microphone’s gain on your desk as an alternative option, but that means you’ll need to filter more white noise out of the broadcast.
When you have a microphone suspension stand that places the equipment near where you sit, you can adjust the placement to the most comfortable spot possible.
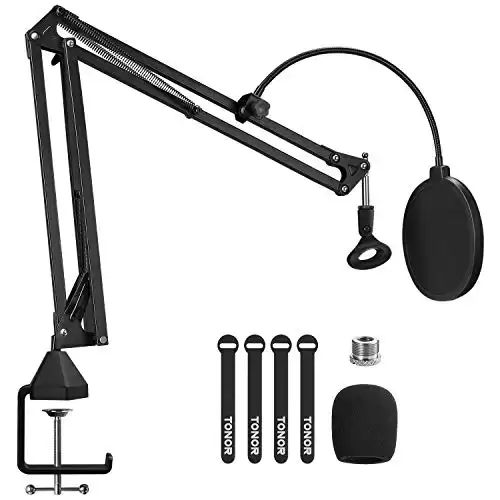
I like using the TONOR Adjustable Suspension Boom for this purpose. It’s a heavy-duty installation with enough strength that it can hold the Blue Yeti Nano securely to achieve the adjustability you need. The design uses universal compatibility with a standard 3/8-inch or 5/7-inc adapter for different shock mounts.
The TONOR suspension boom delivers 360 degrees of support while coming with an extra pop filter, foam cover, and cable ties.
4. Independent Webcam
Your viewers want to see how you react to different situations while playing games or managing the circumstances that are part of the livestream event.
They also want to see who you are because that makes them feel like there’s a bit of a relationship there.
It is in your best interest to purchase the best webcam you can afford to have a fantastic Twitch stream. Even if you don’t locate a great server to use, the video quality still matters when interacting with others.
Most of today’s webcams are built with streaming in mind. That means you can record with 1080p quality at 30 frames per second.
You can always step things up to broadcast in 4K, but only your viewers with a monitor capable of that resolution would benefit from the investment.
That means for your first days on Twitch, a 1080p HD webcam is typically suitable for meeting your streaming needs.
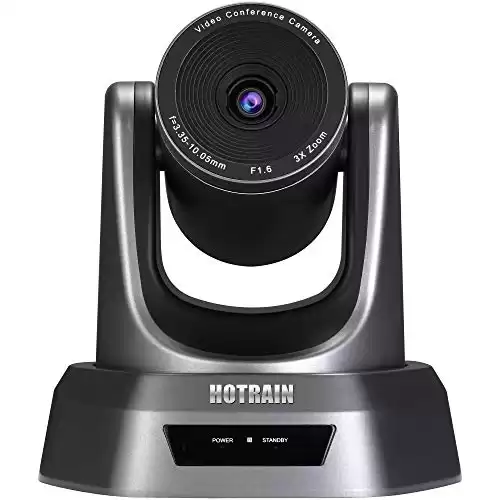
Although you can find several options priced for under $50, I prefer something a little better because I want zoom capabilities with my equipment. That’s why I use the Hotrain Webcam with 3X Optical Zoom.
An upgraded model provides 10x zoom, although I feel that’s a bit much for most home-based streaming needs.
The camera comes with a microphone for your regular conference calls or Zoom meetings, but it also easily works with your other streaming equipment. It allows you to adjust the video acquisition parameters to improve liquidity and quality.
You will need upload speeds of at least 2M bits per second to have a stable stream when using this equipment. It works with a standard USB 2.0 cable.
5. Capture Cards
This equipment option isn’t necessary if your Twitch streams are limited to PC games. You can use screen recording software to capture your gameplay to let the audience watch while broadcasting.
If you play on an Xbox or PlayStation console, you’ll need to invest in a reliable capture card that will create the broadcast you want. Most options connect to the USB port to make the process as simple as possible, especially with the HDMI port from your TV working in conjunction with it.
This setup allows for high-quality resolutions while playing on Twitch, even if you’re using something like a Nintendo Gamecube.
Strong capture cards require a direct installation, which means you’ll want to avoid that scenario whenever possible.
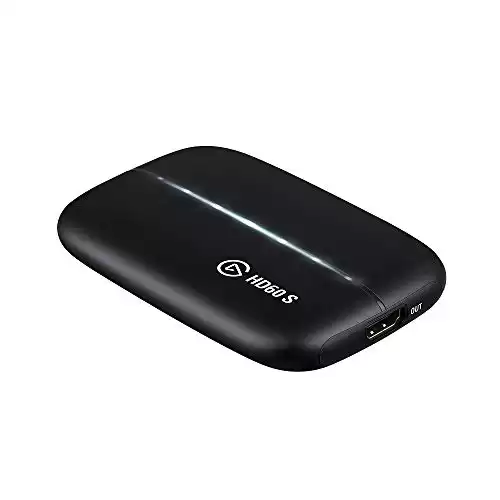
I love using the Elgato 1080p 60 Capture Card. It has a zero-lag passthrough, ultra-low latency, and works with today’s top consoles. The hardware interface is USB 3.0, delivering unencrypted HDMI with several supported resolutions. It even delivers 720p at 60 or 30, along with 576p or 480p.
It works with macOS Sierra or higher or Windows 10. You’ll need an Intel Core i5-4xxx quad-core or better, along with specific GPU requirements based on your platform.
You’ll need to prevent your stream from recording at all times, especially when you have a slow connection. Once you have everything set correctly for your Twitch server, you’ll find that this investment makes a lot of sense.
Final Thoughts on JTVPing and Finding the Best TwitchTV Server
Although we’re past the days of using JTVPing for Twitch, that doesn’t mean you can’t use other tools to find the best server. Although anyone can be on Twitch when they follow the platform’s guidelines, the most popular streams tend to be the ones with a high production value.
It also helps to think about the equipment you have for your streaming needs.
Even though you don’t need to spend a fortune to be on Twitch, it does help to invest a little in these areas. I’ve found the recommendations here to be useful, and I hope you do as well.